
Calculator Widget for Elementor
On this page
- What It Does
- Why It Matters
- Benefits
- Required Setup
- How to Activate the Calculator Widgets?
- Key Features
- How to Use the Calculator Widgets in Elementor?
- Slider – Calculator
- Dropdown – Calculator
- Radio – Calculator
- Number – Calculator
- Formula – Calculator
- How to Create a Calculator in Elementor?
- Use Cases
- Limitations
- Troubleshooting
What It Does
Adding an online calculator to an Elementor website can improve the user experience, especially when users need to calculate something, like an EMI calculation, a discount calculation, etc. Normally, to add such calculators in Elementor, you have to use third-party services or custom code.
However, with the WDesignKit Calculator widgets, you can easily create different types of calculators without any coding. WDesignKit offers a group of calculator widgets that you can use in different combinations to create complex calculators.
Why It Matters
Interactive calculators (EMI, discount, shipping cost, quote estimators) are a common ask for service and e-commerce sites. Without a no-code option, building one means a custom JS widget or a third-party embed that doesn’t match your site’s design. The Calculator widgets let you assemble the same result with Elementor’s native styling controls.
Benefits
- No custom code or third-party embed needed for common calculator use cases
- Five composable input widgets cover slider, dropdown, radio, and number inputs; mix and match per calculator
- Full Elementor style controls on every widget, so the calculator matches your site’s design
Required Setup
- Elementor FREE Plugin installed & activated.
- You need to have the WDesignKit plugin installed and activated.
- Make sure you’ve created an account and logged into it.
- These are pro widgets. A valid WDesignKit Pro license is required to access and use them.
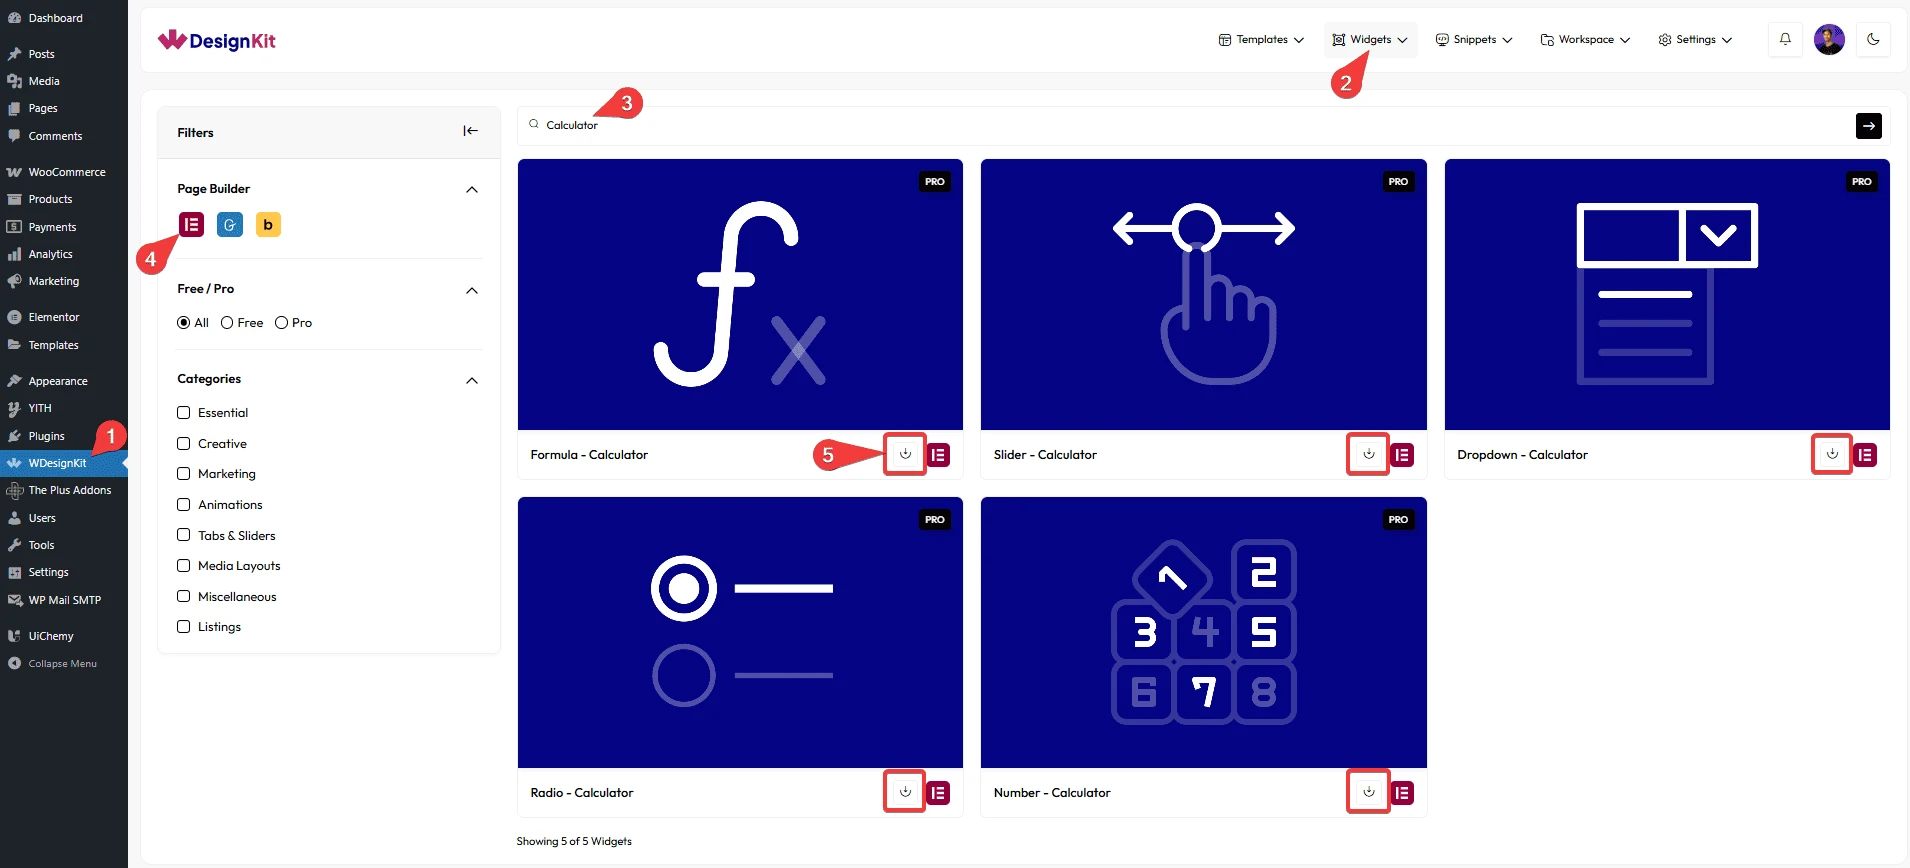
- Make sure you’ve downloaded the Formula – Calculator, Slider – Calculator, Dropdown – Calculator, Radio – Calculator, and Number – Calculator widgets to create different types of calculators.
How to Activate the Calculator Widgets?
Go to
- WDesignKit → Widgets → Browse Widgets.
- Search the widget name and select Elementor as the Page Builder.
- Download all the widgets.
Key Features
- Create custom calculators – You can write custom formulas to create a custom calculator.
How to Use the Calculator Widgets in Elementor?
You have to use the Formula – Calculator widget with any one or combination of Slider – Calculator, Dropdown – Calculator, Radio – Calculator, and Number – Calculator widgets.
Update (September 2026): We rebuilt this exact Discount Calculator live in a docker WDesignKit 2.6.6 environment and captured a real, verified worked example below. The individual per-widget clips further down are the original walkthroughs and remain unchanged.
Slider – Calculator
With this widget, you can add a range slider.
Content
In the Title Text field, you can add a label.
You can set a default value for the range slider in the Default Value field.
Then you have to set a maximum, minimum, and steps for the range slider from the Max Value, Min Value, and Step fields, respectively.
Prefix/Postfix Label
You can add text before the current value in the Prefix Text field.
Similarly, you can add text after the current value from the Postfix Text field.
Min/Max Label
You can add a label to the minimum and maximum value from the Min Label Text and Max Label Text fields, respectively.
From the Position dropdown, you can place the label before or after the minimum and maximum values.
Connection
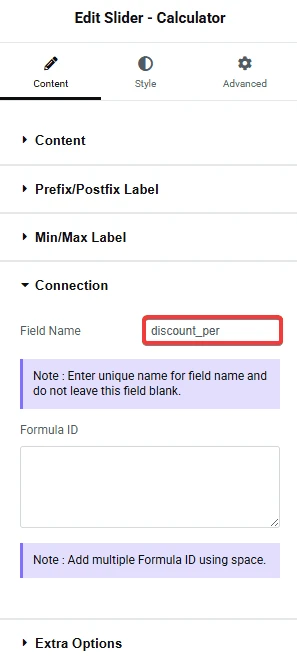
In the Field Name field, you have to add a unique name that will be used to create the connection Formula – Calculator widget. i.e. price_range
In the Formula ID field, you have to add the Formula – Calculator widget ID on which you want to show the output. You can add multiple IDs using a space. i.e. result
Below, you can see the values we added in the Field Name and Formula ID for connection. Similarly, in the Formula – Calculator widget, we added the same values inside the Math Formula (within square brackets) and in the ID field.
Extra Option
You can individually hide the minimum value and maximum value labels by enabling the Hide Min Value and Hide Max Value toggles, respectively.
By enabling the Thumb Glow Effect toggle, you can add a growing circle effect on the range slider thumb.
From the Style tab, you can style all the options.
Dropdown – Calculator
With this widget, you can add a dropdown option.
Content
In the Title Text field, you can add a label.
Dropdown Options
In the Add Option section, you have to add options for the dropdown. You’ll find an item; open the item.
In the Name field, you have to add the option name.
Then, in the Value field, you have to add the value of the option that will be used for calculation.
You can click on the +Add Item button to add more options.
Connection
In the Field Name field, you have to add a unique name that will be used to create the connection Formula – Calculator widget. i.e. period
In the Formula ID field, you have to add the Formula – Calculator widget ID on which you want to show the output. You can add multiple IDs using a space. i.e. result
From the Style tab, you can style all the options.
Radio – Calculator
With this widget, you can add a radio button option.
Layout
From the Style dropdown, you can change the radio button layout to Style 1 (horizontal) or Style 2 (vertical).
Content
From the Select Type dropdown, you can change the radio button type. Here you’ll find four options –
- Simple – To use the default radio buttons.
- Button – To use buttons as radio buttons.
- Icon – To use icons as radio buttons.
- Image – To use images as radio buttons.
Then, in the Title Text field, you can add a label.
Items
In the Add Item section, you have to add the radio button options. You’ll find an item; open the item.
In the Name field, you have to add the option name.
Then, in the Value field, you have to add the value of the option that will be used for calculation.
You can add an icon in the Select Icon section if you are using the Icon option as the radio button type.
Similarly, you can add an image in the Select Image section if you are using the Image option as the radio button type.
You can click on the +Add Item button to add more options.
Columns
From the Columns tab, you can manage the radio button columns for desktop, tablet, and mobile from the Desktop Column, Tablet Column, and Mobile Column fields, respectively.
Connection
In the Field Name field, you have to add a unique name that will be used to create the connection Formula – Calculator widget. i.e. type
In the Formula ID field, you have to add the Formula – Calculator widget ID on which you want to show the output. You can add multiple IDs using a space. i.e. result
From the Style tab, you can style all the options.
Number – Calculator
With this widget, you can add a number field.
Content
In the Title Text field, you can add a label.
In the Price Sign field, you can add a price sign symbol.
You can set a default value for the range slider in the Default Value field.
Then you can set a maximum and minimum range from the Max Value and Min Value fields, respectively.
You can also add an increment step value in the Step field.
Prefix/Postfix Label
In the Prefix Text field, you can add text before the number value
Similarly, you can add text after the number value from the Postfix Text field.
Connection
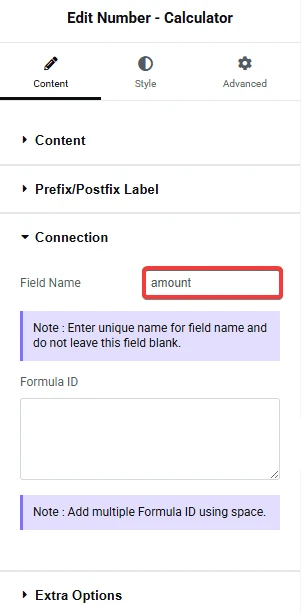
In the Field Name field, you have to add a unique name that will be used to create the connection Formula – Calculator widget. i.e. amount
In the Formula ID field, you have to add the Formula – Calculator widget ID on which you want to show the output. You can add multiple IDs using a space. i.e. result
Extra Options
By enabling the Show Buttons toggle, you can add increase and decrease buttons in the number field.
From the Style tab, you can style all the options.
Formula – Calculator
With this widget, you can add a result field where the calculation result will show.
Connection
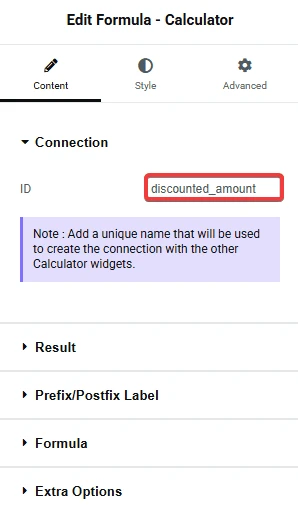
In the ID field, you have to add a unique name that will be used to create the connection with the other Calculator widgets. i.e. result
Result
In the Title Text field, you can add a label for the result.
Prefix/Postfix Label
You can add text before and after the result from the Prefix Text and Postfix Text fields, respectively.
Formula
In the Math Formula field, you have to write the calculation formula. You have to add the Field Name ID of the calculator widget you want to use, inside a [] like [range].
You can use multiple Field Name IDs with standard mathematical operators like +, -, *, /, (), etc., to create a formula like this – ([percentage_value]/100)*[number_value].
Extra Options
By enabling the Inline Layout toggle, you can show the label and result on the same line.
From the Style tab, you can style all the options.
How to Create a Calculator in Elementor?
With the Calculator widgets, you can create different types of calculators of different complexity levels.
For example, we’ll create a simple Discount Calculator, where we’ll show the discount amount and the discounted amount, i.e. amount after the discount.
To calculate the discounted amount, we’ll use this formula: Amount – (Amount * Discount/100)
Then, to calculate the discount amount, we’ll use this formula: Amount * (Discount/100)
For this, we’ll use the combination of the Formula-Calculator, Slider-Calculator, and Number-Calculator widgets.
1. Add the Number – Calculator widget, and in the Field Name, add the id as amount.
Then adjust the Title Text, Default Value, Max Value, Min Value, and Step fields as per your requirements.
2. Add the Slider-Calculator widget, and in the Field Name, add the ID as discount_per.
Then adjust the Title Text, Default Value, Max Value, Min Value, and Step fields as per your requirements.
3. Then add the Formula – Calculator widget, and in the ID, add the ID as discounted_amount.
Adjust the Title Text as per your requirements.
4. Add another Formula – Calculator widget, and in the ID, add the ID as discount_amount.
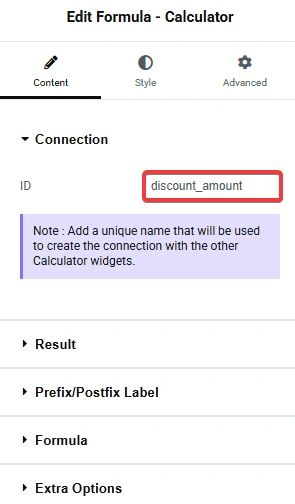
5. Then, in the Number-Calculator widget, go to the Connection tab and add the discounted_amount discount_amount in the Formula ID field to create the connection with the two formula widgets.
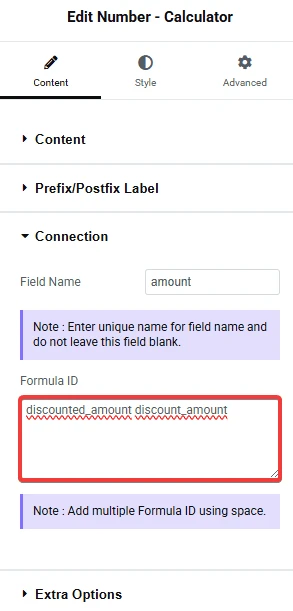
6. Similarly, select the Slider-Calculator widget, go to the Connection tab, and add the discounted_amount discount_amount in the Formula ID field.
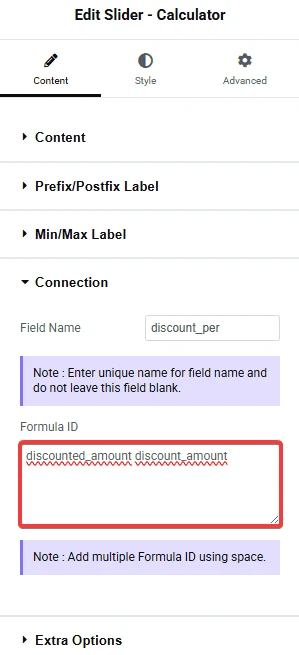
7. Now select the first Formula – Calculator widget, and go to the Formula tab.
Here we’ll add the formula to calculate the discounted amount. For this, we’ll add the following formula in the Math Formula field.
[amount]-([amount]*[discount_per]/100)
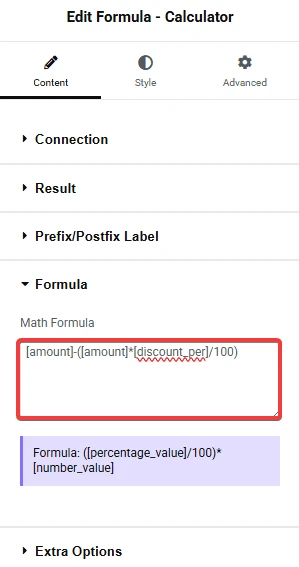
8. Then select the second Formula – Calculator widget, and go to the Formula tab.
Here we’ll add the formula to calculate the discount amount. For this, we’ll add the following formula in the Math Formula field.
[amount]*([discount_per]/100)
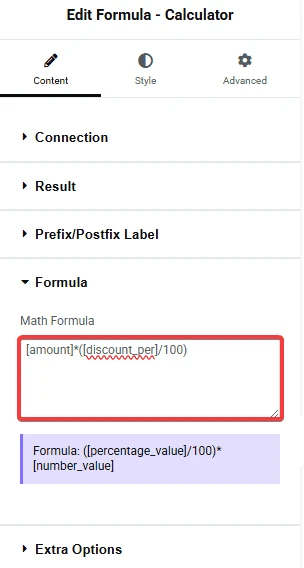
You can adjust the style of each widget as per your requirements.
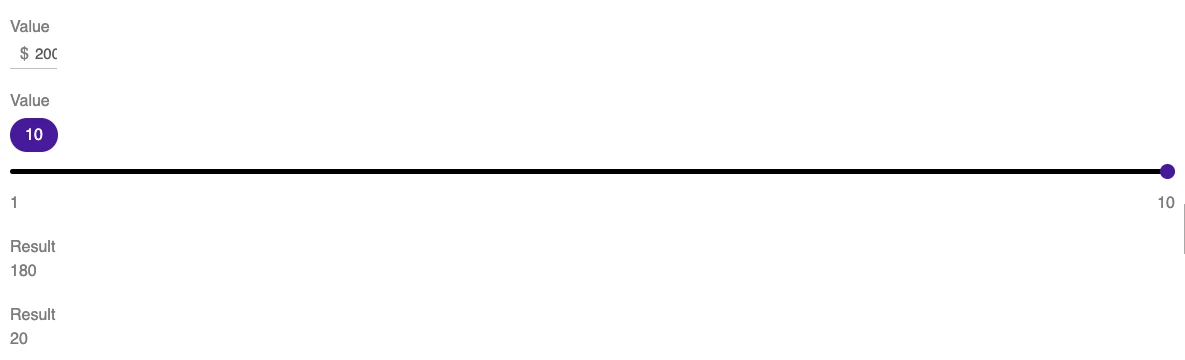
Now you should have a working discount calculator where you can add an amount, and set a discount percentage, then it will auto calculate the discounted amount and discount amount.
Live-verified worked example: $200 amount at a 10% discount, calculated in real time by the Discount Calculator built above (WDesignKit 2.6.6, September 2026).
This is how you can create more complex calculators using custom formulas.
Use Cases
- Discount / price calculators for e-commerce or service pricing pages
- EMI or loan repayment estimators for finance-related sites
- Shipping cost or quote calculators based on selectable options
- Any multi-input estimator where the result updates live as visitors change values
Limitations
- These are Pro widgets: a valid WDesignKit Pro license is required, and each of the five widgets (Formula, Slider, Dropdown, Radio, Number) must be individually downloaded.
- The Math Formula field supports standard operators (+, -, *, /, parentheses) and bracketed field references; it is not a full scripting language, so complex conditional logic (nested IF statements, for example) is not guaranteed to work and should be tested before relying on it in production.
- Every input widget must share matching Field Name / Formula ID values with its connected Formula – Calculator widget(s); a typo in either breaks the connection silently rather than throwing a visible error.
Troubleshooting
- Formula field returns no result / calculation doesn’t run: per FluentSupport ticket #20248, nested
IF(...)conditional logic in the Math Formula field is not reliably supported; stick to standard arithmetic operators (+, -, *, /, parentheses) with bracketed field references, and test complex logic before publishing. - License activation spins forever / doesn’t complete: per FluentSupport ticket #13923, a Pro license activation that hangs on the loading indicator is a known support case; try refreshing the page and re-entering the license key, and contact support if it persists.
- Result field stays blank: double-check that the Field Name on every input widget exactly matches the corresponding ID referenced in the Formula – Calculator widget’s Math Formula and Formula ID fields; a mismatch silently breaks the connection.