
How to White Label WDesignKit with Your Brand Name?
On this page
What It Does
White Label replaces WDesignKit’s own plugin name, description, developer name, website URL, and icon with your own brand throughout the WordPress menu and plugin page.
Why It Matters
Agencies and freelancers building client sites usually do not want a third-party plugin name showing up in the client’s wp-admin. White Label lets the plugin blend into your own branded toolset instead.
What You Get
A single White Label popup covering the plugin’s name, description, developer or agency name, website URL, and icon, plus checkboxes to hide help links, update news, the licence tab, and the rollback tab.
Benefits
- A consistent, fully branded admin experience for agency clients, with no visible WDesignKit name.
- The Enable Force Disable Options checkbox stops clients from ever seeing or changing the White Label settings themselves.
- Reversible at any time by resetting the settings, so rebranding is never a one-way decision.
Capabilities
- Rebrand the plugin name, description, developer/agency name, website URL, and icon shown in wp-admin and the Plugins list.
- Hide help links, plugin-update news banners, the licence key tab, or the plugin rollback tab independently.
- Force-disable the White Label card entirely so a client account cannot revert or change the branding, reversible by deactivating and reactivating the plugin.
How It Works
Saving the White Label form stores your branding fields and checkbox choices as plugin options. WordPress then reads those stored values wherever it would normally print the plugin’s own name, description, or icon, in the Plugins list, the admin menu, and the plugin page, and substitutes your values instead.
How to Use It
If you’re interested in white labeling the WDesignKit plugin with your brand name, we’re here to help you through the process.
The White Label feature is available with both the Studio and Lifetime plans of WDesignKit.
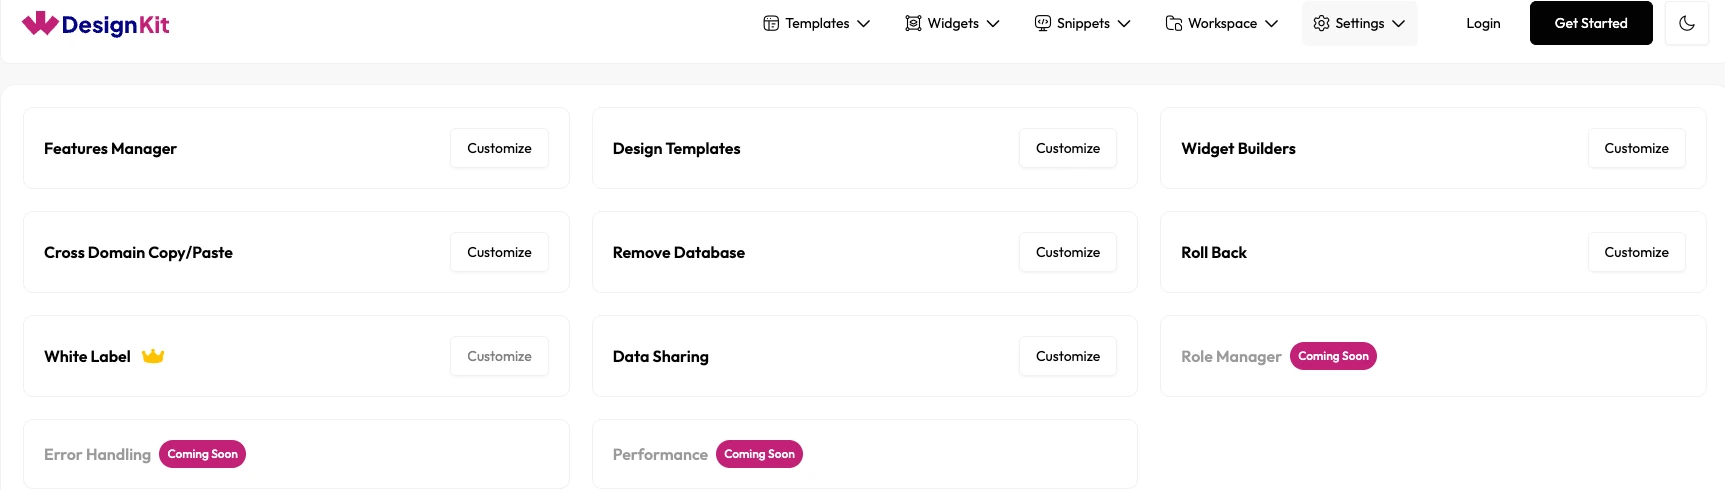
To White Label WDesignKit with your Brand Name, from the WordPress Dashboard, go to WDesignKit > Settings > General Settings.
Then go to the White Label section and click on the Customize button.
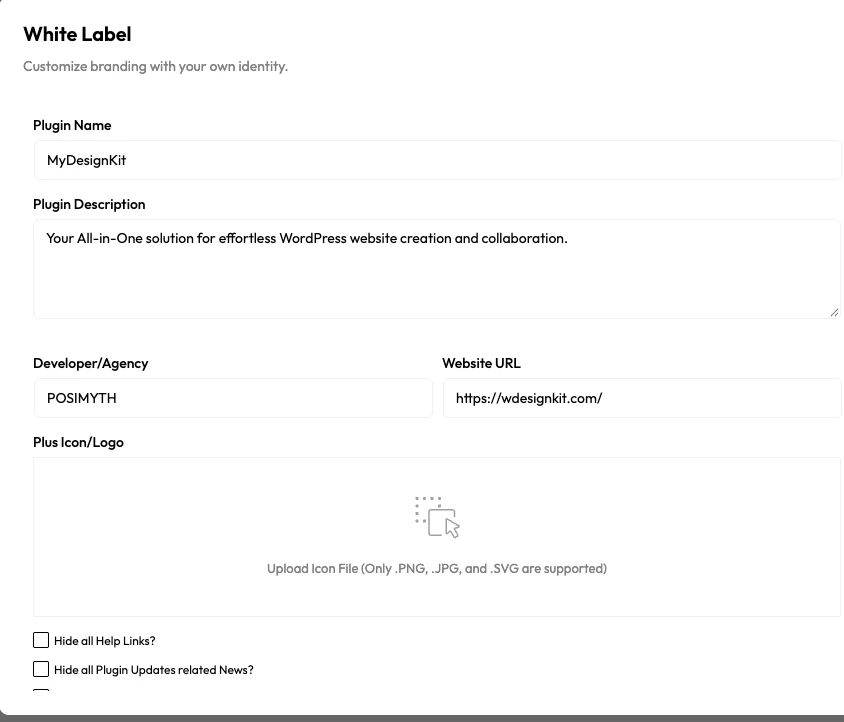
It will open the White Label popup, here you need to fill up the form with your information.
Plugin Name – Here you have to add your plugin name. It will replace the plugin name in the WordPress menu and plugin page.
Plugin Description – Here you can add the plugin description, which will show on the plugin page.
Developer/Agency – Here you can add your brand name, which will show on the plugin page.
Website URL – Here you can add the website URL of your brand name.
Plus Icon/Logo – Here you can add the icon for the plugin, which will show in the WordPress menu and on WDesignKit page.
Then you’ll find some options to manage plugin settings.
Hide all Help Links? – Enable this checkbox to hide all the links (except brand name) from the plugin in the plugin page.
Hide all Plugin Updates related News? – Enable this checkbox to hide all the future (not the existing ones) WDesignKit news related banners.
Hide Licence Key Tab? – Enable this checkbox to hide the licence page. This is an ideal option if you don’t want your clients to access the licence page.
Hide Plugin RollBack Tab? – Enable this checkbox to hide the Roll Back card from the General Settings page of WDesignKit.
Enable Force Disable Options – Enable this checkbox to completely remove the White Label card from the General Settings page of WDesignKit. This is an ideal option if you don’t want your clients to make any changes to the white label settings. If you want to get the White Label option back, simply deactivate and activate the plugin again.
Once done, click on the Save Settings button to save the changes. The page will reload and you’ll see the changes.
You can click on the Reset button to restore the White Label settings to their default values.
Now if you go to the Plugins section, you’ll see your custom plugin names along with other details such as plugin description, your brand name, and website URL.

Use Cases
- An agency rebranding WDesignKit under its own toolset name before handing a site over to a client.
- Hiding the rollback and licence tabs on a client site so the client cannot accidentally change either.
- Locking the White Label settings themselves with Enable Force Disable Options so a client cannot revert the branding.
Limitations
- White Label is available only on the Studio and Lifetime plans; confirm current plan names and inclusions on wdesignkit.com/pricing before relying on this.
- Turning on Enable Force Disable Options removes your own way back into the settings from the plugin page; deactivating and reactivating the plugin is the documented way to restore access.
- White Label changes how the plugin is labeled; it does not change WDesignKit’s own functionality, licensing, or update mechanism.
Troubleshooting
- The White Label option is greyed out and cannot be clicked. This can happen even when a licence key shows as active, since White Label access is gated by plan tier (Studio or Lifetime), not by licence activation alone. Confirm your current plan under Settings > Manage Licence, or upgrade at wdesignkit.com/pricing, before opening the White Label popup.
- Locked myself out of the White Label settings. This matches the documented Force Disable behavior above: deactivate and reactivate the WDesignKit plugin from the Plugins page to restore access to the White Label card.
- Custom icon does not show after saving. Confirm the uploaded icon is a standard image format (PNG, JPG, or SVG) and reload the wp-admin page, since the menu icon can be cached by the browser.
FAQs
How to Revert White Label?
In case you wish to remove your branding, go to WDesignKit > Settings > General Settings. Then go to the White Label section and click on the Customize button. In the popup, click on the Reset button, it will revert to the original plugin branding.
Will I Receive Updates After White Labelling?
Yes! You will continue to get updates even after white labelling. These updates will not affect your white label settings.
How to Hide the White Label Option?
To hide the white label option, go to WDesignKit > Settings > General Settings. Then go to the White Label section and click on the Customize button. In the popup, check the Enable Force Disable Options checkbox and click on the Save Settings button. This will remove the White Label option.